How do you install a WordPress theme on your website?
Share
Sign Up to our social questions and Answers Engine to ask questions, answer people’s questions, and connect with other people.
Login to our W3Make Forum to ask questions answer people’s questions & connect with other people.
Lost your password? Please enter your email address. You will receive a link and will create a new password via email.
Please briefly explain why you feel this question should be reported.
Please briefly explain why you feel this answer should be reported.
To install a WordPress theme on your website, follow these steps:
1. Log in to your WordPress dashboard. (e.g., http://www.yourwebsite.com/wp-admin)
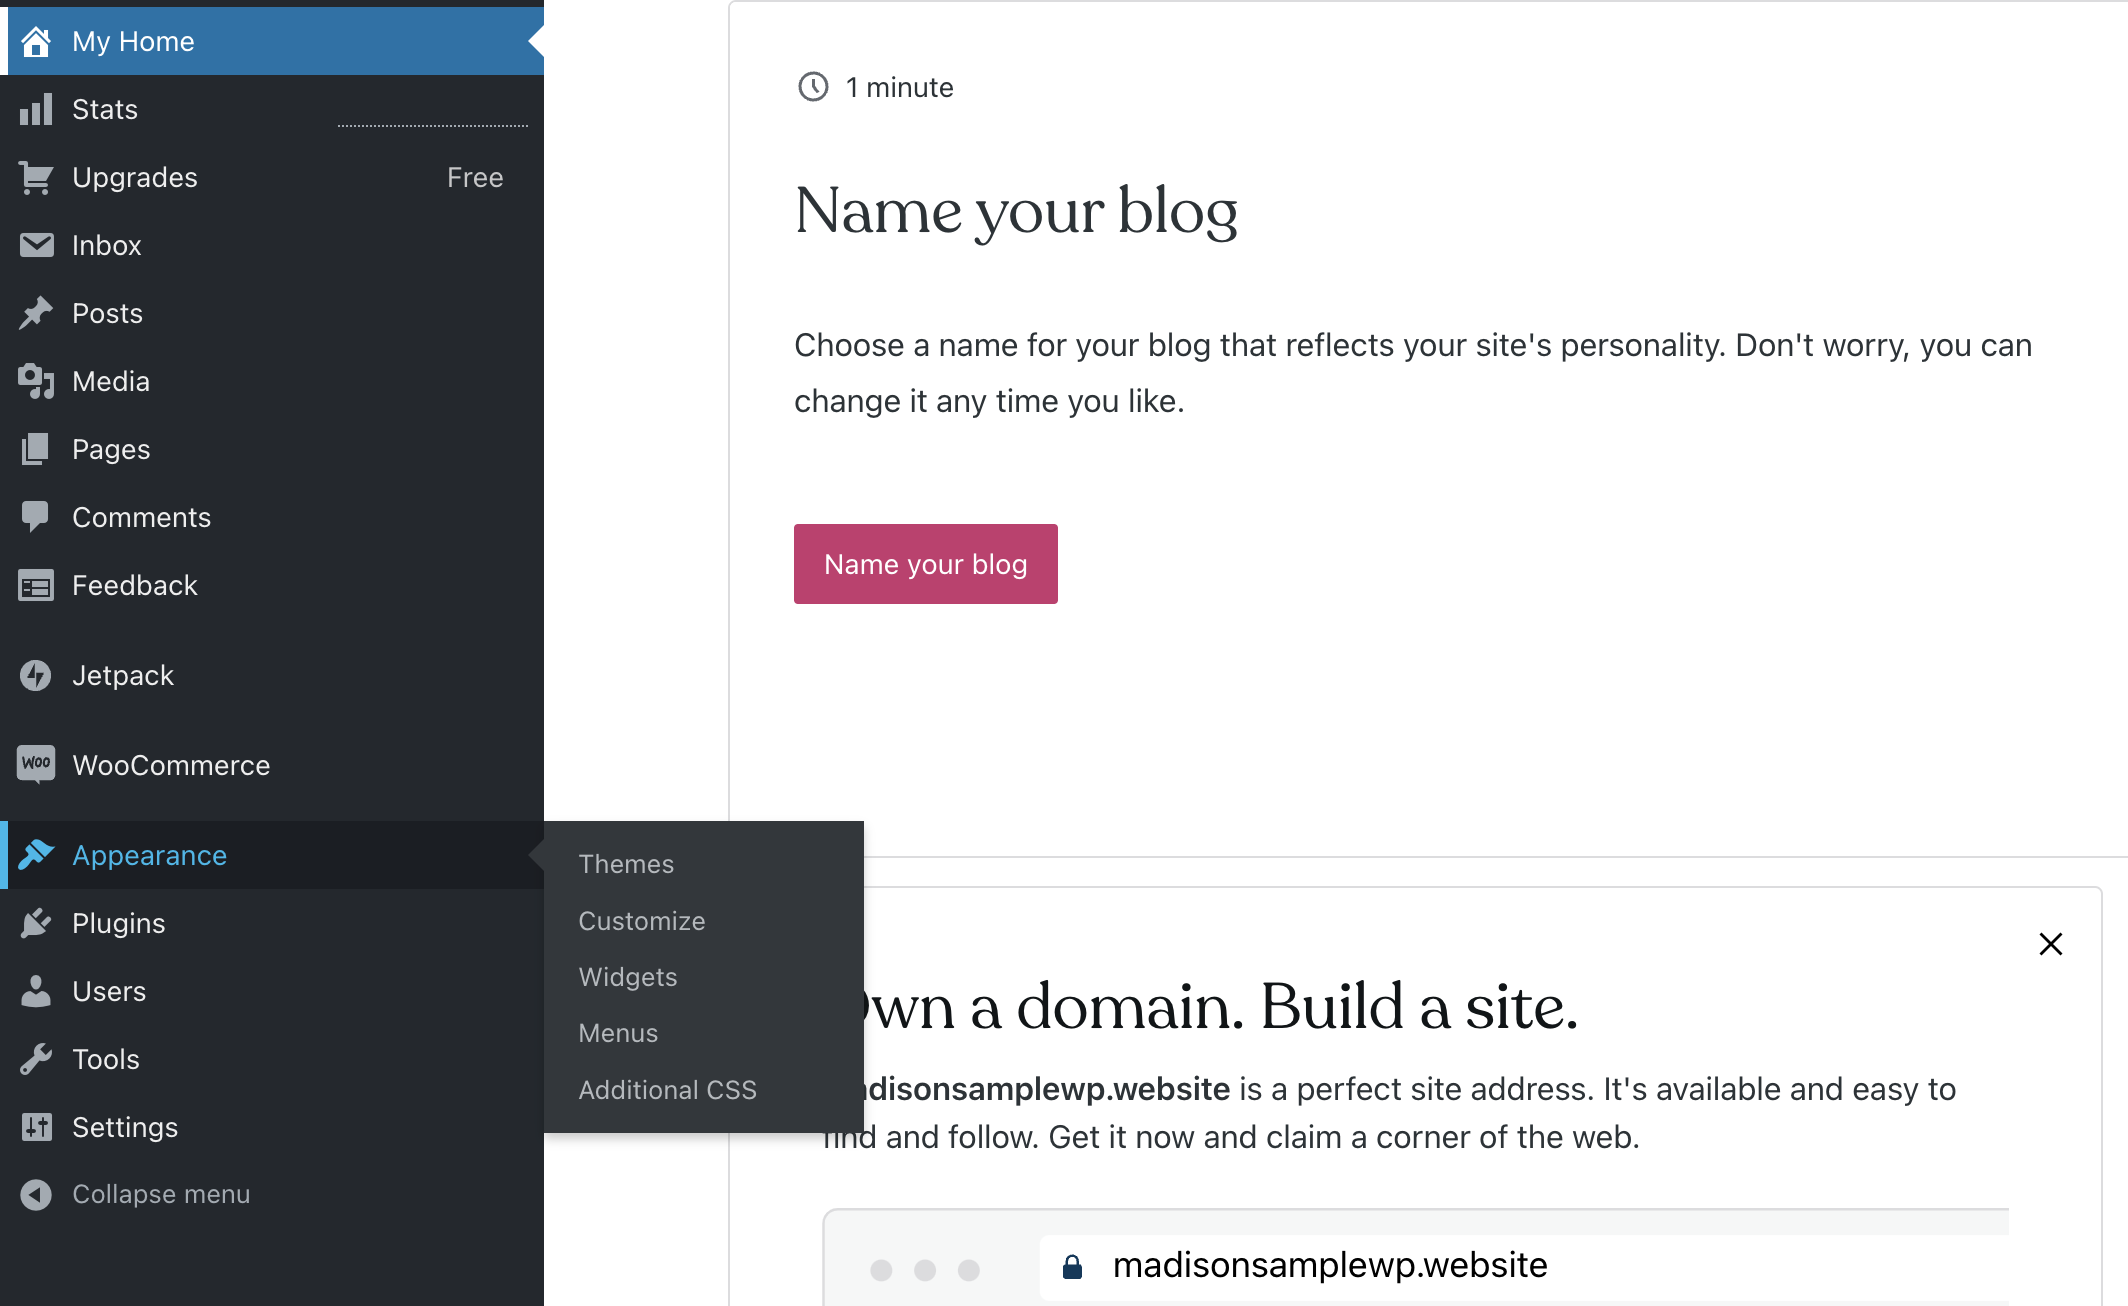
2. Navigate to the “Appearance” section in the left-hand menu and click on “Themes.”
3. On the Themes page, click the “Add New” button at the top.
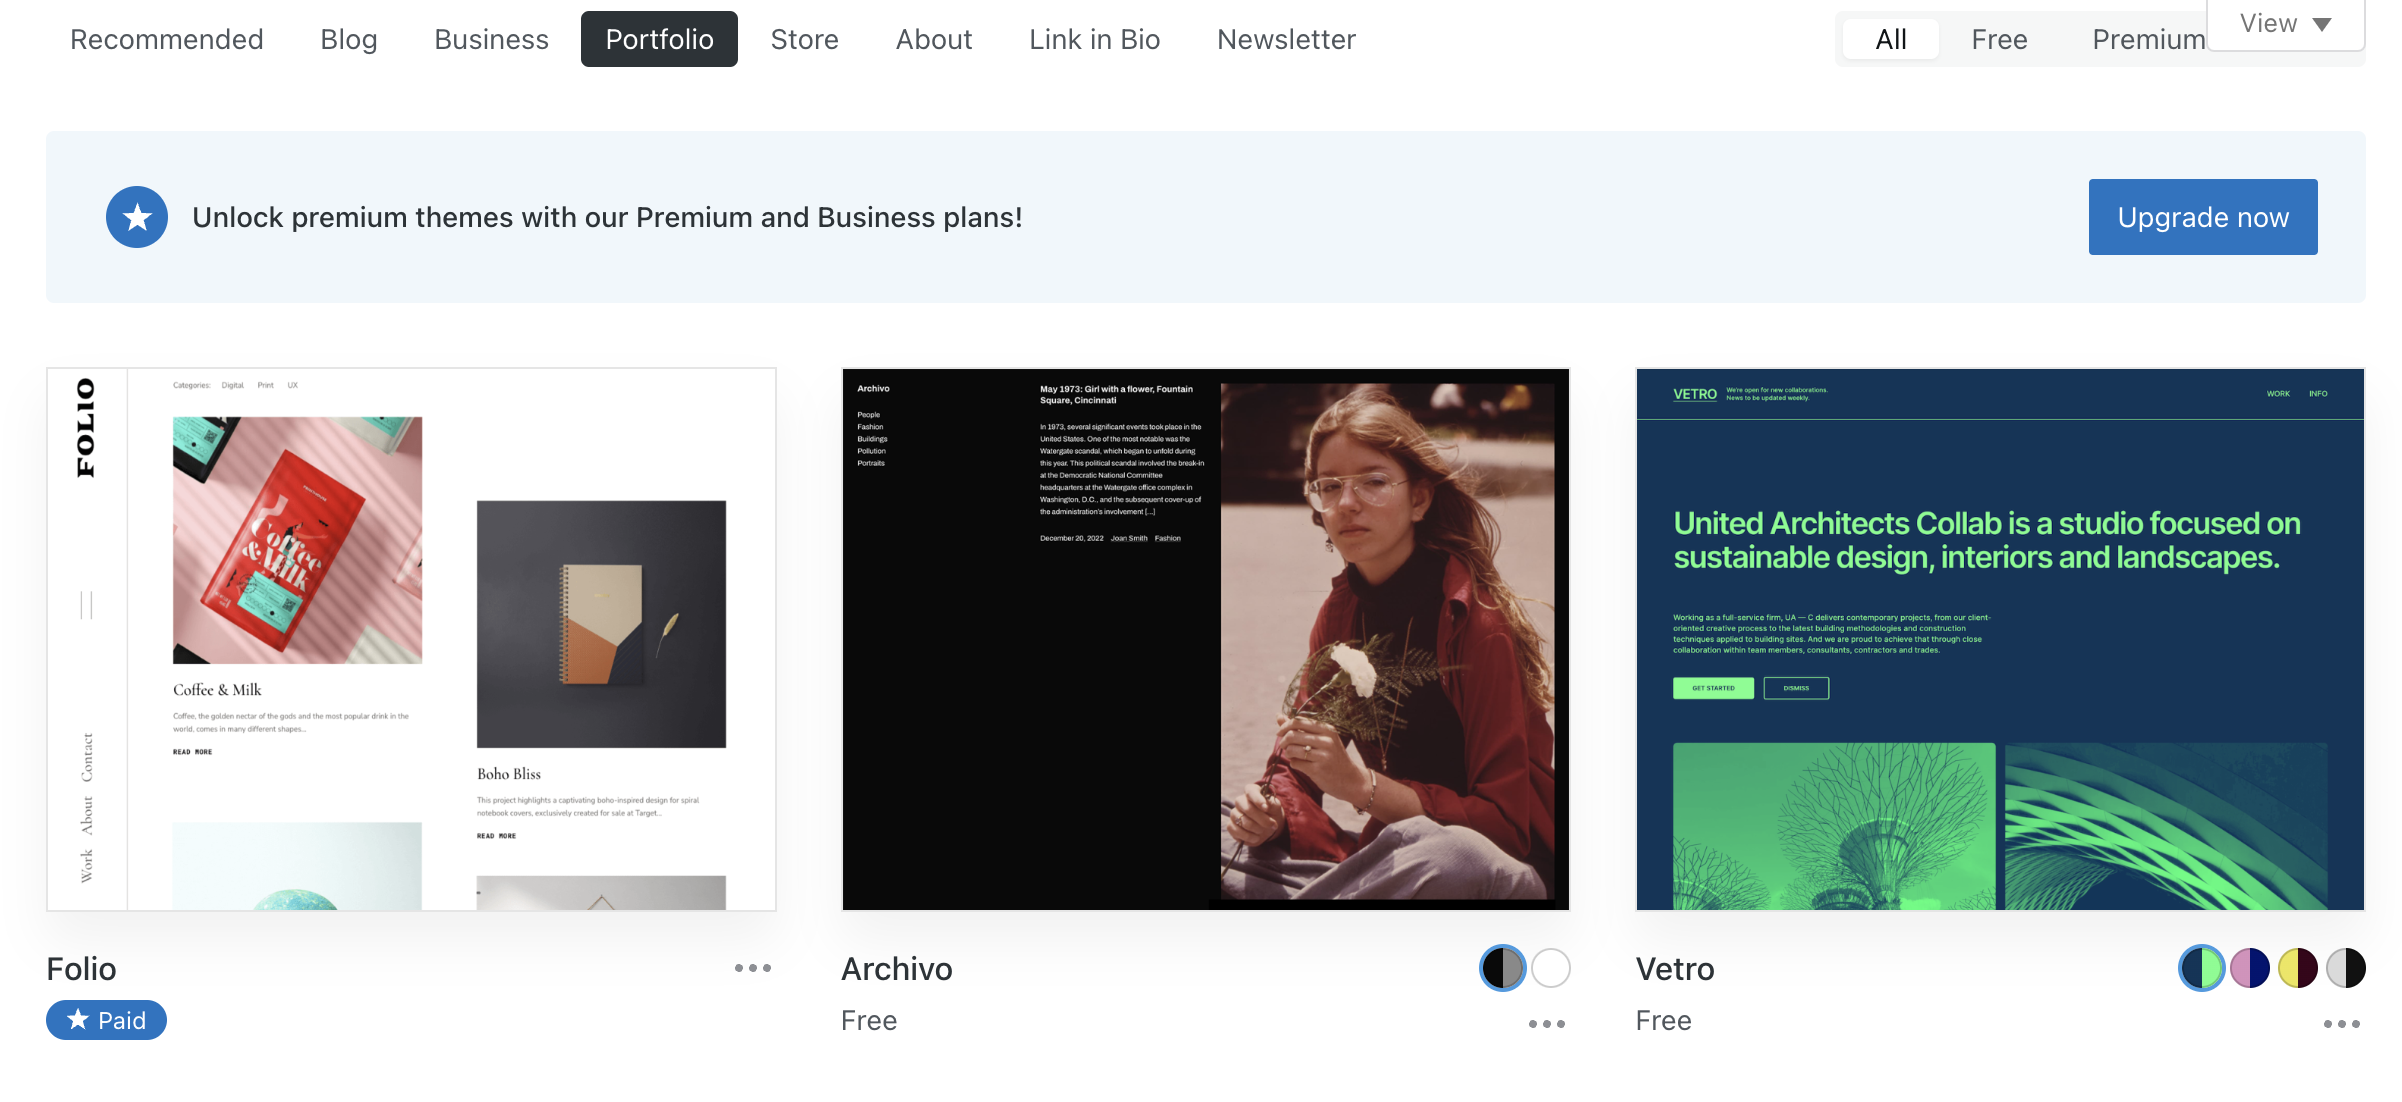
4. You can search for a theme by using the search bar or browse through the Featured, Popular, or Latest themes.
5. Once you find a theme you like, hover over it and click the “Install” button.
6. After the theme is installed, click the “Activate” button to make it the active theme for your website.
7. You can customize the theme’s settings by clicking on the “Customize” option under the Appearance menu.
Alternatively, if you have a theme file in .zip format that you’ve downloaded from a third-party source or purchased, you can install it by following these steps:
1. From the Themes page in your WordPress dashboard, click the “Upload Theme” button at the top.
2. Click the “Choose File” button, select the .zip file of the theme from your computer, and click “Install Now.”
3. WordPress will upload and install the theme. Once done, click the “Activate” button to make it active.
Remember to select a theme that is compatible with your version of WordPress and meets your website’s requirements in terms of design and functionality.
Certainly! Here are the steps to install a WordPress theme on your website:
1. Login to your WordPress dashboard: Access the admin area of your WordPress website by entering your username and password on the login page. This will take you to the WordPress dashboard, where you can manage various aspects of your website.
2. Navigate to “Appearance” -> “Themes” in the sidebar: In the WordPress dashboard, you’ll find a sidebar on the left-hand side. Look for the “Appearance” tab and hover over it to reveal the submenu. From the submenu, click on “Themes.”
3. Click on the “Add New” button at the top: On the Themes page, you’ll see a button labeled “Add New” at the top. Click on it to proceed with adding a new theme to your WordPress website.
4. Search or upload a theme: In the Add Themes page, you have two options. You can either search for a theme by typing keywords in the search bar, which will display a list of available themes matching your search criteria. Alternatively, if you have a theme file downloaded on your computer, you can upload it using the “Upload Theme” button. Click on the preferred option to proceed.
5. Install the theme: Once you’ve found a theme you like, either through the search results or by uploading a theme file, click on the “Install” button associated with that theme. WordPress will then proceed to install the theme on your website. This may take a few seconds, depending on the size of the theme and your server’s performance.
6. Activate the theme: After the installation is complete, you’ll see a message confirming the successful installation. From there, click on the “Activate” button to activate the theme on your website. Once activated, the theme will be applied to your website, and visitors will see the new design and layout based on the chosen theme.
That’s it! By following these steps, you can easily install and activate a WordPress theme to customize the look and feel of your website.
To install the custom WordPress theme we have two option and we would discuss both of them here and you need to follow the steps as described-
Steps for installing theme from WordPress dashboard-
1. Go to the WordPress dashboard of your site
2. Go to appearance > themes
3.There is a option beside Add themes to upload theme
4.Upload the zip file of your custom theme.
5.After successful uploading of theme, click on the Install to install the theme.
6.After installation just activate the theme by click on Activate.
Custom theme will be activated.
Steps for installing theme manually from the files-
1.Reach to the theme folder in your site by following the path /wp-content/themes/
2.You can place the theme in the themes folder that you want to use for your site.
3. Now, Go to the WordPress dashboard of your site
4. Go to appearance > themes
5. Custom theme would be listed here.
6.You can activate theme by click on the Activate button.
Custom theme will be activated.
Installing a WordPress theme on your website is a straightforward process. Here’s a step-by-step guide:
That’s it! You have now installed and activated a WordPress theme on your website. You can visit your website’s front end to see how the new theme looks, and further customize it to meet your specific requirements.
To install a WordPress theme on your website, follow these steps:
1. Login to your WordPress admin dashboard. Typically, you can access it by appending “/wp-admin” to your website’s URL (e.g., http://www.yourwebsite.com/wp-admin).
2. Once logged in, navigate to the “Appearance” section in the left sidebar and click on “Themes.” This will take you to the Themes page.
3. On the Themes page, you’ll see the currently installed themes. To add a new theme, click on the “Add New” button at the top of the page.
4. You’ll be presented with different options for finding and installing themes. Here are a few methods:
– Featured: This section displays popular themes selected by WordPress.
– Popular: This section lists themes based on their popularity.
– Latest: This section shows the most recently released themes.
– Search: You can enter specific keywords to search for themes.
– Upload Theme: If you have a theme file in .zip format, you can upload and install it directly.
5. Choose the method you prefer to find the theme you want. Once you find a theme you like, hover over it, and you’ll see options such as “Install” and “Preview.” Click on “Install” to install the theme.
6. WordPress will download and install the theme for you. After the installation is complete, you’ll see a “Activate” button. Click on it to activate the theme and make it live on your website.
7. Once activated, you can customize the theme settings and appearance by going to “Appearance” > “Customize” in your WordPress admin dashboard. This will open the WordPress Customizer, where you can make changes to the theme’s colors, layout, typography, and more.
1. Login to your WordPress Dashboard: Open your web browser and enter the URL of your website followed by “/wp-admin” (e.g., http://www.yourwebsite.com/wp-admin). Enter your username and password to access the WordPress Dashboard.
2. Navigate to the Themes Section: In the WordPress Dashboard, locate the “Appearance” tab in the left-hand menu and hover over it. From the submenu, click on “Themes.” This will take you to the Themes page.
3. Add a New Theme: On the Themes page, click on the “Add New” button at the top of the screen. Here, you have two options:
a. Install from WordPress.org Themes Directory: If you want to install a theme from the official WordPress.org Themes Directory, you can use the search bar to find a specific theme or browse through the available options. Once you find a theme you like, click the “Install” button to install it.
b. Upload a Theme: If you have a theme in a ZIP file that you downloaded from a third-party source, you can click on the “Upload Theme” button at the top of the screen. Now choose the file and, select the theme ZIP file from your computer, and click on install.
4. Activate the Theme: After the theme is installed, you will be redirected to a confirmation page. Now Click on the “Activate” button to make the theme active on your website.
5. Customize the Theme: Once the theme is activated, you can customize its settings and appearance. Go to the “Appearance” tab in the WordPress Dashboard and click on “Customize.” This will launch the WordPress Customizer, where you can make changes to the theme’s colors, layouts, menus, widgets, and more.
1. Log in to your WordPress account.
To begin, log in to your WordPress account.
2. Navigate to Appearance > Themes.
On the menu on the left side of the dashboard, hover your mouse over Appearance, and select Themes within that option box.
3. On the Themes page, select “Add New” or search by theme type or price.
On this page, you can search for themes by their style or price. Use the search bar or scroll through the options provided on the home page.
If you would like to upload a new theme, you can do so by selecting the install or upload button. This will take you to the following screen where you can upload your theme file.
Source
4. Choose a theme.
If you aren’t uploading a new theme, you can select from featured themes, popular themes, or latest themes in the theme marketplace. You can even search for themes with specific features, such as themes with sticky posts or full-width templates; layouts, such as grid layouts or two-column layouts; and subject, such as blogs, eCommerce, or photography.
5. Click Download to begin the installation process.
When you’ve chosen a theme, hover over the preview image of the theme. You’ll have the option to click More Info to learn about the theme’s features and preview the theme, or you can click Activate This Design to begin the installation process.
6.Click Activate once complete.
The theme will take a few minutes to install. After installing, you’ll receive a message that the installation was successful. But the theme isn’t live on your website just yet! Be sure to select Activate for the theme to appear on your site.
To install a WordPress theme on your website, follow these steps:
Follow these straightforward steps to install a WordPress theme on your website:
You will see a list of featured themes, but you can also use the search bar to locate a specific theme. You can also select the “Upload Theme” icon if you’ve downloaded a.zip file containing a theme from another source.
Remember that installing a new theme may alter your website’s appearance and layout. Choose a theme that meets your requirements and is compatible with your version of WordPress.
To install a WordPress theme on your website, you can follow these steps:
1. Login to your WordPress admin area: Open your web browser and enter the URL of your WordPress website followed by “/wp-admin” (e.g., “yourwebsite.com/wp-admin”). Enter your login credentials to access the admin area.
2. Navigate to the “Themes” section: Once logged in, you’ll be in the WordPress dashboard. Look for the “Appearance” option in the left-hand menu and hover over it. A submenu will appear, and you should click on “Themes.”
3. Click on “Add New”: On the “Themes” page, you’ll see an option labeled “Add New” at the top. Click on it to proceed.
4. Choose a theme: You can browse through the featured themes or use the search bar to find a specific theme. Additionally, you can upload a theme in a ZIP format if you have one from a third-party source.
5. Preview the theme: Before installing the theme, you can click on the “Preview” button to get a live preview of how it will look on your website. This step is optional but can help you make an informed decision.
6. Install the theme: If you’re satisfied with the preview or have made your choice, click on the “Install” button. WordPress will start downloading and installing the theme files.
7. Activate the theme: Once the theme is installed, you’ll see a success message. To activate the theme and make it live on your website, click on the “Activate” button.
8. Customize the theme: After activation, you can customize the theme further by going to “Appearance” > “Customize.” This will allow you to modify various aspects of the theme, such as colors, fonts, layout, and more.
That’s it! You have successfully installed and activated a WordPress theme on your website. You can now start customizing the theme to suit your preferences and add content to build your website.
These steps can be used to install a WordPress theme on your website:
1.Enter the WordPress administration area. In most cases, you can access it by adding “wp-admin” to the end of the URL of your website (for example, http://www.yourwebsite.com/wp-admin).
2.Once you’ve logged in, go to the “Appearance” area of the left-hand menu and select “Themes.”
3.You may view the currently installed themes on the Themes page. Click the “Add New” button at the top of the page to add a new theme.
4.You’ll be sent to the “Add Themes” page, where you can browse the options or conduct a search for a particular theme. Themes can be found using keywords, characteristics, or other particular criteria. Additionally, you can look at the “Featured” or “Popular” themes.
5.Hovering over a theme will reveal the “Install” button once you’ve found one you like. To begin the installation procedure, click on it.
6.The theme will be downloaded and installed by WordPress from the theme repository. An installation success message will appear after it is finished.
7.You have the choice of activating the theme immediately after installation or first viewing it. Before making the theme live, you can select to preview it to see how it appears on your website.
8.Click the “Activate” button if you desire to use the theme. Your website will now use the new theme, and visitors will see the changes.
The procedure is slightly different if you have a premium theme that you have bought or acquired from a third-party source. In that scenario, take the following actions:
1.From the website where you purchased the premium theme, download the theme files. Normally, the files come in.zip format.
2.Go to the “Appearance” section of your WordPress admin dashboard after logging in, then click “Themes.”
3.Click the “Add New” button at the top of the Themes page.
4.Click the “Upload Theme” button at the top to upload a theme rather than looking for one.
5.You’ll be asked to select the theme you downloaded’s.zip file. Locate the file on your computer, then click the “Choose File” button to choose it.
6.After choosing the.zip file, select “Install Now” from the menu. The theme will be uploaded and installed by WordPress.
7.An installation success message will appear after it is finished. The theme is then either activated or can be previewed before activation.
8.Click the “Activate” button if you desire to use the theme. Your website will now use the premium theme.
Keep in mind to look over the theme’s documentation for any particular instructions or suggested adjustments.
1)First login to your WordPress account
2)navigate to apperance > themes
3)on the themes page, select “add new” or search by theme type or price
4) choose a theme
5)click download to start installation process
6)click activate once completed
WordPress theme are templates and stylesheet which is created by web designers and Web developers. That are available to download directly on your webside.
There are some way to install wordpress through theme directory on your webside.
WordPress Installing Process –
Now install WordPress successfully on your webside.
you can install a WordPress theme manually by following these steps:
Installing a WordPress Theme Through the Theme Directory
a. If you want to install a free theme from the official WordPress repository, you can browse through the available themes or use the search bar to find a specific theme. When you find the desired theme, click the “Install” button.
b. If you have a premium theme or a custom theme in a .zip format that you downloaded from a third-party website or purchased, click on the “Upload Theme” button. Then, click the “Choose File” button to select the theme file from your computer, and finally, click the “Install Now” button.
That’s it! You have successfully installed a WordPress theme on your website. You can now customize the theme settings and start building your website with the newly installed theme.
1)Log In to your WordPress Account .
2)Navigate to Appearance>Themes.
3)On the Theme page, select “Add New” or search by Theme Type or Price .
4)Choose a Theme
5)Click Download to begin the Installation process for Theme .
6)Click Activate when download is completed.
These steps can be used to install a WordPress theme on your website:
1.Access the WordPress admin dashboard by logging in. Typically, you can do this by going to “yoursite.com/wp-admin” and entering your login information.
2.After signing in, go to the “Appearance” section on the left-hand menu and select “Themes.”
3.You can view a list of the installed themes on the Themes page. Click the “Add New” button at the top to add a new theme.
4.Now, you can either upload a premium theme in ZIP format by selecting the “Upload Theme” button or browse the WordPress Theme Directory, which includes free themes.
a. You can use the search bar to find a specific theme or browse the featured, popular, or latest themes on the WordPress Theme Directory to install a free theme. Click the “Install” button next to the theme you’d like to add to your website.
b. Select the “Upload Theme” button to install a free or paid theme that you downloaded from the internet. The theme ZIP file from your computer will then be selected after you click the “Choose File” button. Select the file, then select “Install Now.”
5.The theme will now be uploaded and installed by WordPress. An installation success message will appear once it is finished. You have the option to either activate the theme right away or go back to the Themes page to do so later.
6.Simply click the “Activate” button located below the theme thumbnail to activate a theme.
Your website has the WordPress theme installed and activated at this point. You can alter the theme’s settings, set up any extra features it offers, and begin creating the content for your website using the features and design of the theme you’ve selected.
How i can troubleshoot and fix the “White Screen of death ” issue in Word Press?
In WordPress, a theme consists of a collection of files (stylesheets, graphics, and code) that dictate what your blog or website will look like. Depending on your theme, you can tweak everything from your site’s layout to the link colors. While a theme can be thought of as a ‘skin’ for your site, they are incredibly powerful. Your website theme affects the appearance of your site, including the typography, layout, color scheme, and other design elements.
To install a WordPress theme, log in to your WordPress admin dashboard. Go to “Appearance” and click on “Themes.” Choose “Add New,” then either upload a theme file or search and select a theme from the WordPress theme repository. Click “Install” and then “Activate” to apply the theme to your website.
To install a WordPress theme on your website follow this steps :
1. Access your WordPress admin dashboard.
2. Log in with your admin username and password.
3. Once logged in, navigate to the “Appearance” section in the left-hand menu and click on “Themes.”
4. You’ll be taken to the Themes page, where you’ll see a list of installed themes. To add a new theme, click on the “Add New” button at the top.
5. On the next screen, you can browse through the available themes. You can use the search bar to look for specific themes, or you can filter them based on features, layouts, etc.
6. When you find a theme you like, hover over it, and you’ll see two options: “Preview” and “Install.” Click on “Preview” to see a live preview of how your website will look with that theme. If you’re satisfied with the preview, click on “Install” to proceed.
7. WordPress will now download and install the theme on your website. Once the installation is complete, you’ll see an “Activate” button. Click on it to make the theme active on your site.
8. After activating the theme, you can customize it further by clicking on the “Customize” link. This will open the WordPress Customizer, where you can modify various aspects of your theme, such as colors, fonts, header images, and more. The options available will depend on the specific theme you’ve installed.
Like this you can install WordPress themes in your website
Log in to your WordPress admin dashboard. This is usually accessed by adding “/wp-admin” to the end of your website’s URL (e.g., http://www.yourwebsite.com/wp-admin).
Once logged in, navigate to the “Appearance” section in the left-hand menu and click on “Themes.”
On the Themes page, click the “Add New” button at the top of the page.
Here, you have two options to install the theme:
a. Installing a free theme from the WordPress repository:
In the search bar on the right, type in the name or keywords related to the theme you want to install.
WordPress will display a list of themes that match your search. Browse through the options and click the “Install” button next to the theme you want.
b. Uploading a premium theme or a custom theme:
If you have a premium theme or a custom theme in the form of a ZIP file, click the “Upload Theme” button at the top of the page.
Click the “Choose File” button and select the ZIP file from your computer.
Once the file is selected, click the “Install Now” button.
WordPress will upload and install the theme. After installation, click the “Activate” button to make the theme active on your website.
Once activated, you can customize the theme by clicking on the “Customize” option under the “Appearance” menu. This allows you to modify various aspects of the theme, such as colors, fonts, layout, and more.
Certainly! Here are the steps to install a WordPress theme on your website.
1. Login to your WordPress dashboard: Access the admin area of your WordPress website by entering your username and password on the login page. This will take you to the WordPress dashboard, where you can manage various aspects of your website.
2. Navigate to “Appearance” -> “Themes” in the sidebar: In the WordPress dashboard, you’ll find a sidebar on the left-hand side. Look for the “Appearance” tab and hover over it to reveal the submenu. From the submenu, click on “Themes.”
3. Click on the “Add New” button at the top: On the Themes page, you’ll see a button labeled “Add New” at the top. Click on it to proceed with adding a new theme to your WordPress website.
4. Search or upload a theme: In the Add Themes page, you have two options. You can either search for a theme by typing keywords in the search bar, which will display a list of available themes matching your search criteria. Alternatively, if you have a theme file downloaded on your computer, you can upload it using the “Upload Theme” button. Click on the preferred option to proceed.
5. Install the theme: Once you’ve found a theme you like, either through the search results or by uploading a theme file, click on the “Install” button associated with that theme. WordPress will then proceed to install the theme on your website. This may take a few seconds, depending on the size of the theme and your server’s performance.
6. Activate the theme: After the installation is complete, you’ll see a message confirming the successful installation. From there, click on the “Activate” button to activate the theme on your website. Once activated, the theme will be applied to your website, and visitors will see the new design and layout based on the chosen theme.
That’s it! By following these steps, you can easily install and activate a WordPress theme to customize the look and feel of your website.
To install a WordPress theme on your website, follow these steps:
1. Log in to your WordPress dashboard. (e.g., http://www.yourwebsite.com/wp-admin)
2. Navigate to the “Appearance” section in the left-hand menu and click on “Themes.”
3. On the Themes page, click the “Add New” button at the top.
4. You can search for a theme by using the search bar or browse through the Featured, Popular, or Latest themes.
5. Once you find a theme you like, hover over it and click the “Install” button.
6. After the theme is installed, click the “Activate” button to make it the active theme for your website.
7. You can customize the theme’s settings by clicking on the “Customize” option under the Appearance menu.
Alternatively, if you have a theme file in .zip format that you’ve downloaded from a third-party source or purchased, you can install it by following these steps:
1. From the Themes page in your WordPress dashboard, click the “Upload Theme” button at the top.
2. Click the “Choose File” button, select the .zip file of the theme from your computer, and click “Install Now.”
3. WordPress will upload and install the theme. Once done, click the “Activate” button to make it active.
Remember to select a theme that is compatible with your version of WordPress and meets your website’s requirements in terms of design and functionality.
1. Obtain the theme files: You can either download a free theme from the official WordPress theme directory (https://wordpress.org/themes/) or purchase a premium theme from a third-party marketplace.
2. Log in to your WordPress admin dashboard: Enter the URL of your website followed by “/wp-admin” (e.g., http://www.yourwebsite.com/wp-admin). Provide your login credentials to access the dashboard.
3. Navigate to the “Appearance” section: In the WordPress dashboard, find the “Appearance” option in the sidebar menu and hover over it. A submenu will appear, and you need to click on “Themes.”
4. Add a new theme: On the Themes page, you’ll see a list of your installed themes. Click on the “Add New” button at the top.
5. Upload the theme: From the Add Themes page, you have two options. If you downloaded a theme from a third-party marketplace, click the “Upload Theme” button. If you obtained a theme from the official WordPress directory, you can search for it using the provided search bar.
6. Install the theme: If you clicked the “Upload Theme” button, you’ll be prompted to choose the theme file from your computer. Select the theme’s ZIP file and click “Install Now.” If you searched for a theme, find the desired theme and hover over it to reveal the “Install” button. Click on it to begin the installation.
7. Activate the theme: Once the theme is installed, you’ll be redirected to a confirmation page. Click on the “Activate” button to make the theme active on your website.
8. Customize the theme: After activating the theme, you can customize its settings. Depending on the theme, you may find customization options under the “Appearance” or “Theme Options” section in the WordPress dashboard. Explore the available settings to modify the appearance, layout, colors, and other aspects of the theme to suit your preferences.
That’s it! You have successfully installed and activated a WordPress theme on your website.
First of all, we have to log in to our wordpress account.
Thn navigate to appearance >>themes
On theme page we have to click on ‘add new’or search any type of theme we like.
Choose a theme.
After choosing install the theme
And the click on activate once completed.
To install a wordpress theme we need to follow these steps:
1. log into your wordpress account.
2.navigate to appearance and then find the themes option.
3. on the themes page select ‘add new’ or search by theme type.
4. choose a theme of your interest and click download to begin the process.
5. once the download process have been completed then press activate.
To install any theme follow the following steps:-
1. Login to your wordpress account using username and password.
2. Find appearance option in dashboard.
3. In appearance option there is a submenu where you find theme option click on it.
4.click on add new option you will find search theme option there.
5.install the theme you want after completion of installed activate the theme.
Go to WordPress dashboard > Appearance > Themes to install the theme directly on the local website. Search for the theme you wish to install on the neighbourhood website next.
There are Two types of Themes, the firdt ones are Premium themes and the second ones are Free themes.
I would share you the easiest way to install and apply Free themes in wordpress.
If you want to use a theme found in the WordPress Repository on your website, the easiest way to do this is on the backend of your website.
First and the formost step is to go to the dashboard area of your wordpress account and then on the left side of the dashboard the eleventh option will be mentioned as “Appearance”, once you click this option there will be five distinct catagories shown to you and you must select the “Themes” option iand after that click “Add New”.
You can use the Filter button to filter the theme results entirely based upon your choice.
You will be introduced to a search option of the Theme Directory. If you want to find a specefic theme for you, you can simply search into the search box and if isn’t the case than you can choose it from the recommended themes.
Once you made an selection then click on click Install. Afterwords, you can also check whether that theme will be looking good after applying or not by clicking on the Live Preview option
If it’s fine then click Activate to finish adding it to your website and a new theme will be added to your wordpress website totally free of cost.
Log in to the WordPress admin dashboard
Go to the “Appearance” section
Click on “Themes”
On the top right of the page, click on the “Add New” button
You can search for the theme you want by entering keywords into the search bar
You can also upload the theme if it is in zip file format
If you are searching for a theme, you can use filters to narrow down your search
Once you have found the theme you like
Hover over the theme you want and click the “Install” button
WordPress installs the theme
Once the installation is complete, you will see an “Activate” button
Click on it and activate the theme
You can also customize the theme’s settings
Under the “Customize” option under the “Lookup” menu, you can make changes to the colors, layouts and typography of the theme to match your preferences
Make the changes you want and click Save & Publish
To install a WordPress theme on your website, follow these steps:
Congratulations! You have successfully installed and activated a WordPress theme on your website. You can now start customizing the theme to suit your needs by adding content, configuring widgets, and adjusting settings through the WordPress Dashboard.